Showing posts with label PCB layout Design Guidelines. Show all posts

Friday, May 1, 2026

SMD Pad Size Calculator for PCB Design

SMD components require precisely sized soldering pads during assembly. Many of the footprints created by PCB designers are still based on data sheets and IPC-7351's standard pad and land size calculations as below.

How to design a SMT Pad

Simple Calculator
X: 0
Y: 0


X: 0
Y: 0

Monday, September 15, 2025

What is Encroached Vias?

The encroached via concept is one that uses soldermask on the bottom via pad without filling the via’s plated-through hole. Encroachment-type vias have the top-side soldermask open and the bottom-side soldermask opening adjusted, so that it is slightly larger than the via hole size (typically +0.06 mm).


Design guideline for encroached vias

If the mask is opened all the way around an EPAD via (OPEN via), then solder can flow out from under the QFN EPAD onto the bottom-side via pad as a big drop. This drop often drips off during the motion of the unit through the reflow oven, pulling solder from the EPAD joint. This solder “scavenging” can render the EPAD connection unreliable and/or cause the device to tilt, resulting in unreliable pin connections.

Encroached via can be created in Altium Design by defining Solder Mask Expansion setting with negative values as below. For best result, via with and Finished hole size, FHS of 0.25 to 0.3mm and bottom-side soldermask opening of 0.055 mm to 0.075mm larger than the FHS.


vias design comparison


Wednesday, July 24, 2024

QFN Package Stencil Design for Thermal Pad

 To effectively remove heat from the package and maximize electrical performance, it is crucial to solder the die paddle to the PCB thermal pad with minimal voids. Despite potential challenges due to thermal vias and the large size of the thermal pad for larger packages, striving for minimal voids is essential. Furthermore, careful consideration must be given to the reflow process, as out-gassing can lead to defects if the solder paste coverage is too extensive. Therefore, using smaller multiple openings in the stencil for solder paste printing is recommended, as this can result in 50% to 80% coverage, as illustrated in the figure below. While improved coverage generally enhances thermal contact, it's important to be mindful of potential voiding and floating issues in QFN packages.

QFN Package Stencil Design for Thermal Pad

Thermal Pad Stencil Design for 7mm x 7mm (Left side) and 10 x 10 QFN Packages with 4.9mm and 7.4sq Pads


Thursday, May 30, 2019

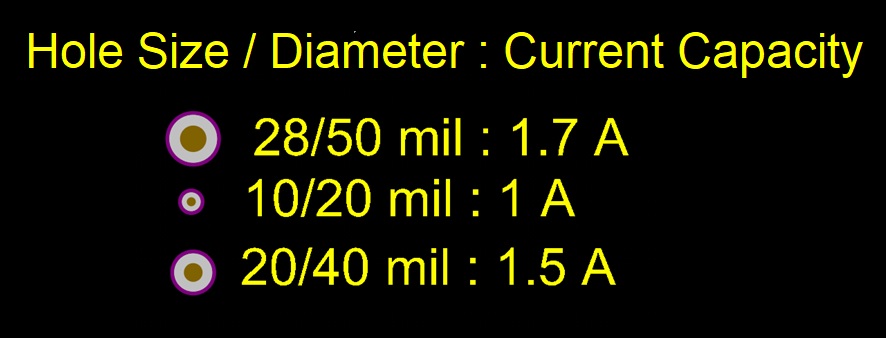
PCB Design : Via Current Carrying Capacity

Maximum via current carrying capacity can be calculated using Saturn PCB Design Toolkit

PCB Design : Via Current Carrying Capacity
Commonly used via size and current carrying capacity are as below.


Tuesday, January 8, 2019

Design for manufacturing or DFM

Design for Manufacturability rules and guidelines are a collection of PCB design best practices to help our design be as easily manufacturable as possible. The easier it is to manufacture a PCB, the more likely it will be to reduce both manufacturing errors and costs. DFM rules have been developed by PCB manufacturing experts and the rules will vary depending on the board design, and the manufacturer's capabilities.

It is highly recommended to check with the PCB manufacturer for their precision and limit on the width of the solder mask Dam. Solder mask dam between surface mount pads will prevent solder bridging during assembly. Below is one of the PCB suppliers' capabilities.

Soldermaks Dam and Design for Manufacturing

In summary, the width of the solder mask dam depends on the copper thickness and solder mask color. Generally, 3 mils of solder mask dam can be achieved using 1oz of copper but that will be 6 mils for 2 oz of copper. Similarly, the minimum solder mask dam for the Green solder mask is 3 mil and others will be 5 mil.

To get a solder mask dam between pads (if individual relief is required) spacing between copper should be 8 mils or more. Otherwise, the finished PCB will get block relief without a solder mask dam.

PCB under microscope with and without solder mask dam can be seen in the photo below.


Saturday, April 21, 2018

Guidelines for the design and layout of high-speed digital logic PCBs

- Give a lot of consideration to component placement and orientation
- Avoid overlapping clock harmonics. Make a harmonic table for each clock
- The clock signal loop area must be kept as small as possible. Get paranoid about clocks.
- Use multilayer boards with power and ground planes whenever possible.
- All high-frequency signal traces must be on layers adjacent to a plane
- Keep signal layers as close to the adjacent plane layer as possible (<10 mils)
- Above 25MHz PCBs should have two or more ground planes
- When power and ground planes are on adjacent layers, the power plane should be recessed from the edge of the ground plane by a distance equal to 20 times the spacing between the planes
- Bury clock signals between power and ground planes whenever possible.
- Avoid slots in the ground plane. This also applies to the power plane.
- If a segmented power plane is necessary, signal traces must not be routed over the slots.
- Filter (series terminate) the output of clock drivers to slow down their rise/fall times and to reduce ringing typically 33 to 70 ohms
- Place the clock & high-speed circuitry as far away from the I/O area as possible.
- Use a minimum of two equal values decoupling capacitors on DIP packages and four on square packages. On high frequency/ high power/noisy IC many more capacitors may be necessary
- Consider using embedded capacitance PCB structure for decoupling on h-f boards (>50 MHz)
- Use impedance-controlled PCB layout technique with proper terminations where necessary
- On impedance-controlled PCB, do not transition the signal from one layer to another unless both layers are referenced to the same plane
- On non-impedance-controlled PCBs, when a clock transitions from one layer to another & the layers are referenced to different planes add a transfer via or capacitor between the planes
- All traces whose length (in inches) is equal to or greater than the signal rise/fall time (in nanoseconds) must have provision for a series-termination resistor (typically 33 ohms)
- Simulate all nets whose length (in inches) is equal to or greater than the signal rise/fall time (in ns)
- Connect logic ground to the chassis (with a very low Z connection) in the I/O area. This is crucial!
- Provide an additional ground-to-chassis connection at the clock/oscillator location.
- Additional ground-to-chassis connection may also be required
- Daughter boards (with h-f, noisy devices, and/or external cables) must be properly grounded to the motherboard and/or chassis (do not rely on the ground pins in the connector to provide this ground)
- Provide C-M filters on all I/O lines. Group all I/O lines together in a designated I/O area of the PCB
- Shunt capacitors used in I/O filters must have a very low impedance connection to the chassis.
- Use a power entry filter on the DC power line (both C-M and D-M)
- Most products in plastic enclosures need to be provided with an additional metal reference plane
- Consider the use of board-level component shields where applicable
- Ground all heat sinks

Power Calculation from Current and Resistance

Power Equation for Current and Resistance P = I² R Current (I) in Amps ...